
9 Product Photography Styles
- Jan 11, 2021
- 4 min read
Updated: May 5, 2023
Product photos don’t have to be boring. There are many different ways you can photograph your gorgeous creations.
For your online store listings, it’s a good idea to include a variety of shots. Shoppers use them to learn about what you're selling, and it also helps them imagine owning or using your product. Remember, they can’t touch or feel what you've made so you have to show them as best you can through photos.
Below are some of the different types of photos you can use.
1. Plain White Background
This is sometimes called a studio shot or individual shot because it features the product by itself on a plain, usually white background. Sometimes you can get away with having a few subtle props for context, but make sure they blend and don’t distract. White is a preferred background colour because it allows your product to really stand out without any other distractions and helps show colours more accurately too.

2. Flat Lay
This is a popular style of photo on Instagram but can also be included in your store listings. It involves laying your product out on a flat surface with a variety of props then taking a photo from directly overhead. This type of photo is great for showing scale and context.

3. Lifestyle
As the name suggests, lifestyle photos show your products being used in a real life situation. They are perfect for showing buyers how your product is meant to be used as well as helping them imagine your product in their own lives. Lifestyle photos don’t always have to involve models. For example, when I was selling my nappy wallets, I set up a tabletop with a soft, cuddly baby rug, some nappies and a soft toy to give my photos a “nursery” look and feel.

4. Close Up / Detail
This type of shot is self explanatory. Again, because buyers can’t see your product in person, you have to show them all the little details that make your creation special. Use these shots to show the finer details such as stitching, texture etc and crop out any unnecessary space or background.

5. Styled
Styled photos can be used in a similar way to lifestyle and flat lays. One of the important things with a styled photo is to keep it simple. If you include too many props it will become difficult for shoppers to see what you’re actually selling. Your product should be the star of the photo and where the viewer’s eye is immediately drawn. Choose your props carefully so they give context and are relevant.

6. Scale
Scale shots are used to give buyers an idea of the size of your product. The way to achieve this is to use an everyday item as a prop, but make sure it’s something that you would normally expect to see with the product you're selling. You can also use a photo with a model, or even someone holding your product in their hand. Lifestyle, Flat Lay and Styled shots can also double as scaled shots.

7. Group
Does you item come in different colours or co-ordinate with some of your other products? Take a photo of them as a group to show buyers how they all look together. This can help shoppers with colour choice or encourage them to buy the co-ordinating products.

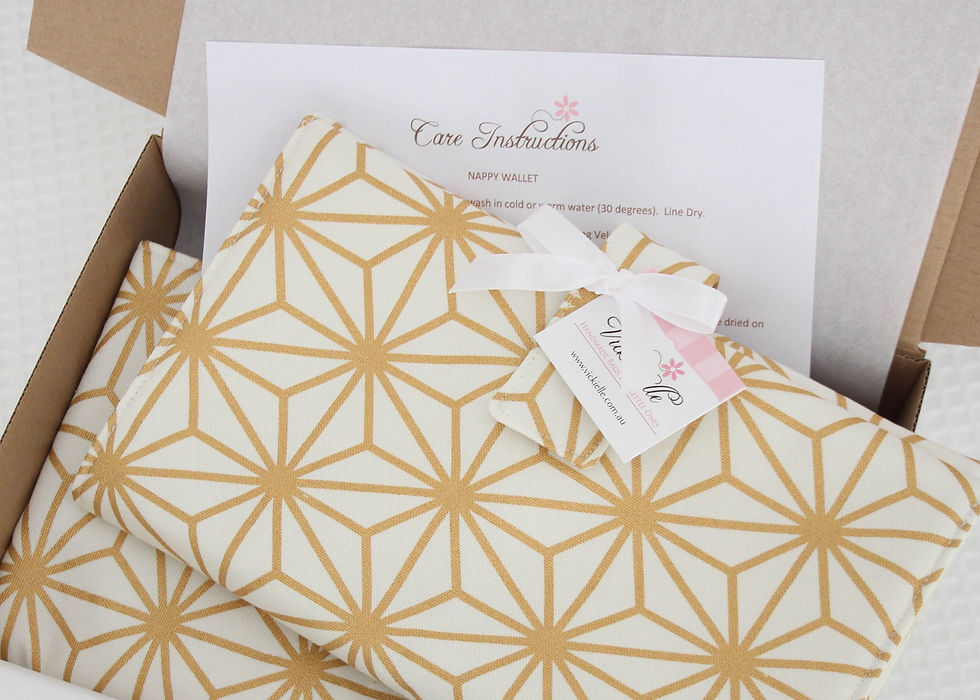
8. Packaging
Showing how your items are packaged so customers know what to expect is a good idea, especially if your product is commonly purchased as a gift. You don’t even have to show the entire package in the shot, even close up detail shots can be beneficial.
9. Process
Often people buy handmade because they love the idea of something being made individually and not mass produced. They love that personal, human touch. An ideal process shot would be of your hands making your gorgeous creations. It doesn’t necessarily have to be the exact item in the listing, it could just be holding some of your tools, or cutting fabric etc. You could even do a packaging and process shot in one by showing your hands putting the finishing touches on a beautifully wrapped parcel.

Not all of these shots have to be included with every listing, and will be dependant on the number of photo spaces your selling platform allows. As a MINIMUM for each product I recommend:
Plain White Background Shot showing the whole product from the front
One additional angle shot i.e. back or side
One or two close up / detail shots
One Lifestyle, Styled or Flatlay Shot
One packaging shot
No matter what types of photos you choose for your store, you should always keep the most important things in mind, and they are:
Use photos that are in focus and not blurry
Edit your photos so they are light and bright, not dark and dull
Your product should be the focal point of the photo i.e. what the viewer’s eye is drawn to when they first look at the photo.
If you're interested in learning more about Product Photography, I have a collection of guides, worksheets, cheat sheets, checklists and more available. They have been written especially for makers and will show you how take beautiful photos of your handmade creations. Find more more by clicking the link below.

I hope you’ve found this blog post helpful, and as always, if you have any questions, please don’t hesitate to contact me at vicki@vickielle.com.au.
Related Posts:


Comments